Connecting Your CRM to Demodesk
Updated November 9, 2026
On this page
- CRM Synchronization Functions
- 1. Salesforce Integration
- 2. HubSpot Integration
- 3. Pipedrive Integration
- 4. Zoho CRM Integration
- Register your Zoho app (company admins)
- Connect your own account
- Change or remove the app
- Automatic CRM Sync for Zoho
- 5. Microsoft Dynamics 365 Integration
- Set up the organization (company admins)
- Connect your own account
- Change or remove the organization
- Troubleshooting Tips
- FAQ
- How do I stop Demodesk from sending anything to HubSpot?
- How do I stop Demodesk from sending anything to Pipedrive?
CRM Synchronization Functions
For Coaching & AI users, CRM integration is designed to provide:
- Automated AI Summaries Sync: AI-generated summaries are based on pre-defined summary templates (prompts), capturing essential details and insights from the conversation. These summaries are synced directly to your preferred CRM as meeting notes, allowing your team to focus on the conversation and have all key points captured automatically. Additionally, the AI Summary can be synced to other objects or properties, e.g., on the Deal level.
- Automated Event/Activity Creation: You can choose whether events should be created or only updated in your CRM if they are not synced through a third party (e.g., Calendar). You can also decide to sync only external or all meetings, giving you full control over which interactions are recorded in the CRM.
- Duplicate Prevention: If your team uses additional calendar integrations (e.g., Google Calendar), the CRM integration can be set to update existing meetings rather than create new ones, preventing duplicate entries.
Let’s walk through the integration steps for each CRM.
1. Salesforce Integration
To connect your Salesforce account to Demodesk:
-
Access Integrations
- Go to your Integration Settings in Demodesk.
-
Connect Salesforce
- Find Salesforce in the CRM options and click Connect.
-
Authorize Access
- You’ll be redirected to Salesforce to log in and grant Demodesk the required permissions to sync meeting data.
-
Configure Integration Settings
- Configure the meeting event synchronization based on your preferences; for example, choose to update only existing events to prevent duplicates if an active event sync is already in place and/or whether the event should be synchronized to the lead or contact related to the account or opportunity object.
-
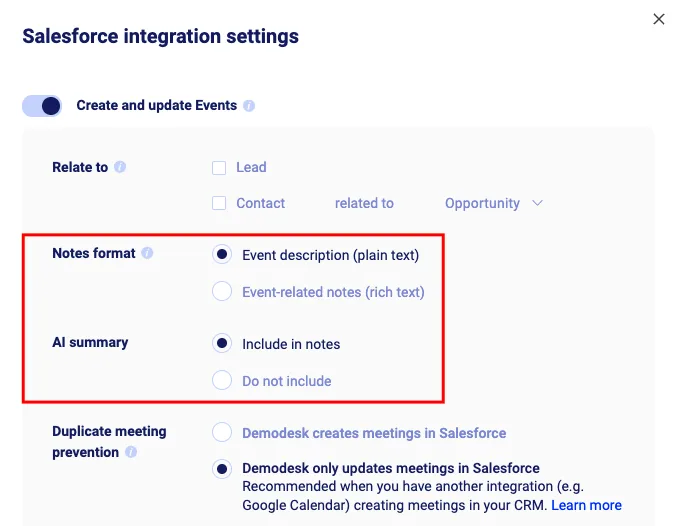
Enable AI Summaries in Notes
-
Option 1: Enable the event description in your CRM settings by setting the Notes format to Event Description. This will ensure that the summary appears in the description field of the event activity. Please make sure that the sync from Salesforce to your calendar is disabled. Otherwise, Einstein Activity Capture will overwrite the event description in the user’s calendar and expose the summary.
-
Option 2: Keep the summary as a note on the event. Please note that the note is not yet linked to the opportunity, so it will only appear on the event itself.
-
Note: Demodesk needs to be connected as an App in Salesforce for users to successfully connect their accounts. This ensures a stable and secure integration across all users.
You can find the steps to set this up here: Salesforce Help – Install a Connected App
🚀 For more details, visit the Salesforce Integration Guide.
2. HubSpot Integration
To set up HubSpot integration for Coaching & AI:
- Navigate to Integrations
- Go to your Integration Settings in Demodesk.
- Connect HubSpot
- Select HubSpot and click Connect.
- Authorize HubSpot Permissions
- Log into HubSpot and allow Demodesk to access your account. Make sure permissions are enabled to sync meeting details.
- Note: Users must have Super Admin permissions in HubSpot to set up a company-wide integration.
- Adjust Integration Settings
- In the HubSpot integration settings, select:
- Duplicate meeting prevention: Select Demodesk only updates meetings in HubSpot if you’re using other calendar integrations to avoid duplicates.
- Meetings to sync: Choose External meetings only if you only want client-facing meetings logged.
- The AI summary has no setting of its own. When a meeting has a summary, Demodesk writes it into the internal notes of the meeting in HubSpot. The only exception is Dialer calls in the HubSpot integration settings, which decides whether the summary of a dialer call is sent as well.
- In the HubSpot integration settings, select:
The AI CRM Concierge can also write to the HubSpot Lead object. AI CRM Concierge explains what it can do there and which permissions your HubSpot connection needs for it.
🚀 For more information, refer to the HubSpot Integration Guide.
3. Pipedrive Integration
To integrate Pipedrive with Demodesk:
- Open Integrations
- Go to your Integration Settings in Demodesk.
- Connect Pipedrive
- Under CRM options, find Pipedrive and click Connect.
- Authorize Pipedrive
- You’ll be directed to Pipedrive to log in and authorize the connection.
- AI summaries in activity notes
- The AI summary has no setting of its own. When a meeting has a summary, Demodesk writes it into the note of the activity in Pipedrive.
🚀 Check out the Pipedrive Integration Guide for additional information.
4. Zoho CRM Integration
Zoho CRM is set up a little differently from the other CRMs. Your company connects Demodesk through your own Zoho app, so a company admin registers that app once. After that, everyone else connects with a single click.
Register your Zoho app (company admins)
- Open Connections
- Go to your Integration Settings in Demodesk, under Settings > Integrations > Connections.
- Start the setup
- In the CRM section, find Zoho CRM and click Connect. The Set up your Zoho OAuth app dialog opens.
- Copy the callback URL
- Click Copy URL next to Callback URL in the dialog.
- Create the app in Zoho
- In the Zoho API Console, create an OAuth app and register the callback URL you just copied as its redirect URL.
- Enter the credentials
- Back in the dialog, enter the Client ID and Client secret of your Zoho app and click Connect. You are then sent to Zoho to sign in and grant Demodesk access.
Connect your own account
Once the app is registered, everyone connects their own Zoho CRM account:
- Go to Settings > Integrations > Connections.
- In the CRM section, find Zoho CRM and click Connect.
- Sign in to Zoho and grant access.
Until a company admin has registered the app, the Connect button on the Zoho CRM card stays disabled for everyone else, with a note asking you to contact a company admin first.
Change or remove the app
Company admins reopen the dialog with Settings on the Zoho CRM card.
- The Client ID and Client secret cannot be edited while an app is stored. To use a different app, remove the current one first.
- Remove app only works while nobody in your company is connected to Zoho CRM. As long as colleagues are connected, the button is disabled and the dialog shows how many accounts are still connected.
Automatic CRM Sync for Zoho
On plans that include Automatic CRM Sync, Zoho gets its own tab under Automations > Automatic CRM Sync as soon as it is connected. Company admins set up there which records and fields get updated after a meeting.
5. Microsoft Dynamics 365 Integration
Microsoft Dynamics 365 is set up once for your whole workspace. A company admin enters your Dynamics 365 organization URL the first time, and everyone else then connects their own account to that same organization.
Set up the organization (company admins)
- Open Connections
- Go to your Integration Settings in Demodesk, under Settings > Integrations > Connections.
- Start the setup
- In the CRM section, find Microsoft Dynamics 365 and click Connect. The Set up your Dynamics 365 organization dialog opens.
- Enter the organization URL
- Enter the Organization URL of your Dynamics 365 organization as it appears in your browser, for example https://yourorg.crm4.dynamics.com. Demodesk only accepts an organization URL on dynamics.com.
- Connect
- Click Connect. You are then sent to Microsoft to sign in and grant Demodesk access.
Connect your own account
Once the organization is set up, everyone connects their own Dynamics 365 account:
- Go to Settings > Integrations > Connections.
- In the CRM section, find Microsoft Dynamics 365 and click Connect.
- Sign in to Microsoft and grant access.
You are not asked for an organization URL. Your account is connected to the organization your workspace is set up with, so everyone ends up in the same Dynamics 365 organization. If you sign in to a different organization, Demodesk does not save the connection and asks you to start again from your settings.
Until a company admin has set up the organization, the Connect button on the Microsoft Dynamics 365 card stays disabled for everyone else, with a note asking a company admin to set the organization up first.
Change or remove the organization
Company admins reopen the dialog with Settings on the Microsoft Dynamics 365 card.
- The Organization URL cannot be edited while an organization is stored. To use a different one, remove the current organization first.
- Remove organization only works while nobody in your company is connected to Dynamics 365. As long as colleagues are connected, the button is disabled and the dialog shows how many accounts are still connected.
Troubleshooting Tips
- Permissions: Confirm that you’ve granted the necessary permissions in each CRM to allow Demodesk access.
- Reconnect if Needed: If syncing issues occur, try disconnecting and reconnecting the CRM.
- Support: Reach out to Demodesk support via the in-app chat for further assistance.
FAQ
How do I stop Demodesk from sending anything to HubSpot?
There is no separate setting for the AI summary. When a meeting has a summary, Demodesk writes it into the internal notes of the meeting in HubSpot. The only exception is Dialer calls in the HubSpot integration settings, which decides whether the summary of a dialer call is sent as well.
To stop everything Demodesk writes to HubSpot for your own meetings:
- Go to Settings > Integrations > Connections.
- Next to HubSpot, click Disconnect.
- If your company uses one company-wide HubSpot connection, the Disconnect from HubSpot dialog opens. Confirm with Disconnect.
Admins see one more option in that dialog: Disconnect everyone in my company from HubSpot. Select it to stop the transfer for the whole company. Leave it unselected and only your own meetings are affected.
Disconnecting applies from that moment on. Anything Demodesk already wrote to HubSpot stays there.
How do I stop Demodesk from sending anything to Pipedrive?
The AI summary has no setting of its own here either. When a meeting has a summary, Demodesk writes it into the note of the activity in Pipedrive.
To stop everything Demodesk writes to Pipedrive for your own meetings:
- Go to Settings > Integrations > Connections.
- Next to Pipedrive, click Disconnect. There is no confirmation step, the connection ends right away.
Admins can also close Pipedrive for the whole company:
- Go to Settings > Integrations > Connections and open Advanced settings.
- Under Integration access, switch Pipedrive to Blocked. Nobody in your company can connect Pipedrive after that.
- The Block Pipedrive? dialog opens. Tick the option to also delete the existing Pipedrive connections if colleagues who are connected today should be disconnected as well, then confirm with Block Pipedrive. Without that tick, connections that already exist keep syncing.
Disconnecting applies from that moment on. Anything Demodesk already wrote to Pipedrive stays there.
By integrating your CRM, the Coaching & AI seat helps your team automatically capture essential meeting summaries, creating a complete record in your CRM with minimal manual effort. Connect your CRM today to make the most of AI-driven coaching and summaries!
Related articles
More in this category
Still need a hand?
Our support team answers in the app chat, or at support@demodesk.com.